Motivation
In this post, I would like to share my knowledge about building software workflows for .net library. A few months ago I decided to publicly release my dotnet library Middlink using GitHub actions. So far my all private projects have been hosted in GitLab and it’s time to go for something new.
I have a habit of always trying out different solutions to gain more experience and grow as a software developer. This approach helps me keep a flexible perspective when solving problems, increases my creativity and confidence in decision-making.
Table of contents
- Introduction
- Script structure
- Workflow directory
- Continouse integration workflow
- Code analysis workflow
- Publish workflow
- Summary
1. Introduction
GitHub actions are a free mechanism for automating software workflows with the use of YAML (Yet Another Markup Language) scripts. It enables the creation of complex automated processes from many workflow scripts which contain numerous jobs that involve multiple steps. This combination definitely helps to orchestrate tasks and makes the whole process more understandable.
GitHub actions can be used to handle the following tasks:
- build source code
- run tests
- evaluate code quality
- build documentation
- publish artifacts
- release notification
… and many more.
There are two ways to start using GitHub actions in a new repository.
- From the template
- go to web page https://github.com
- create/navigate to destination repository
- navigate to Actions tab
- choose workflow template
- commit workflow script into destination branch
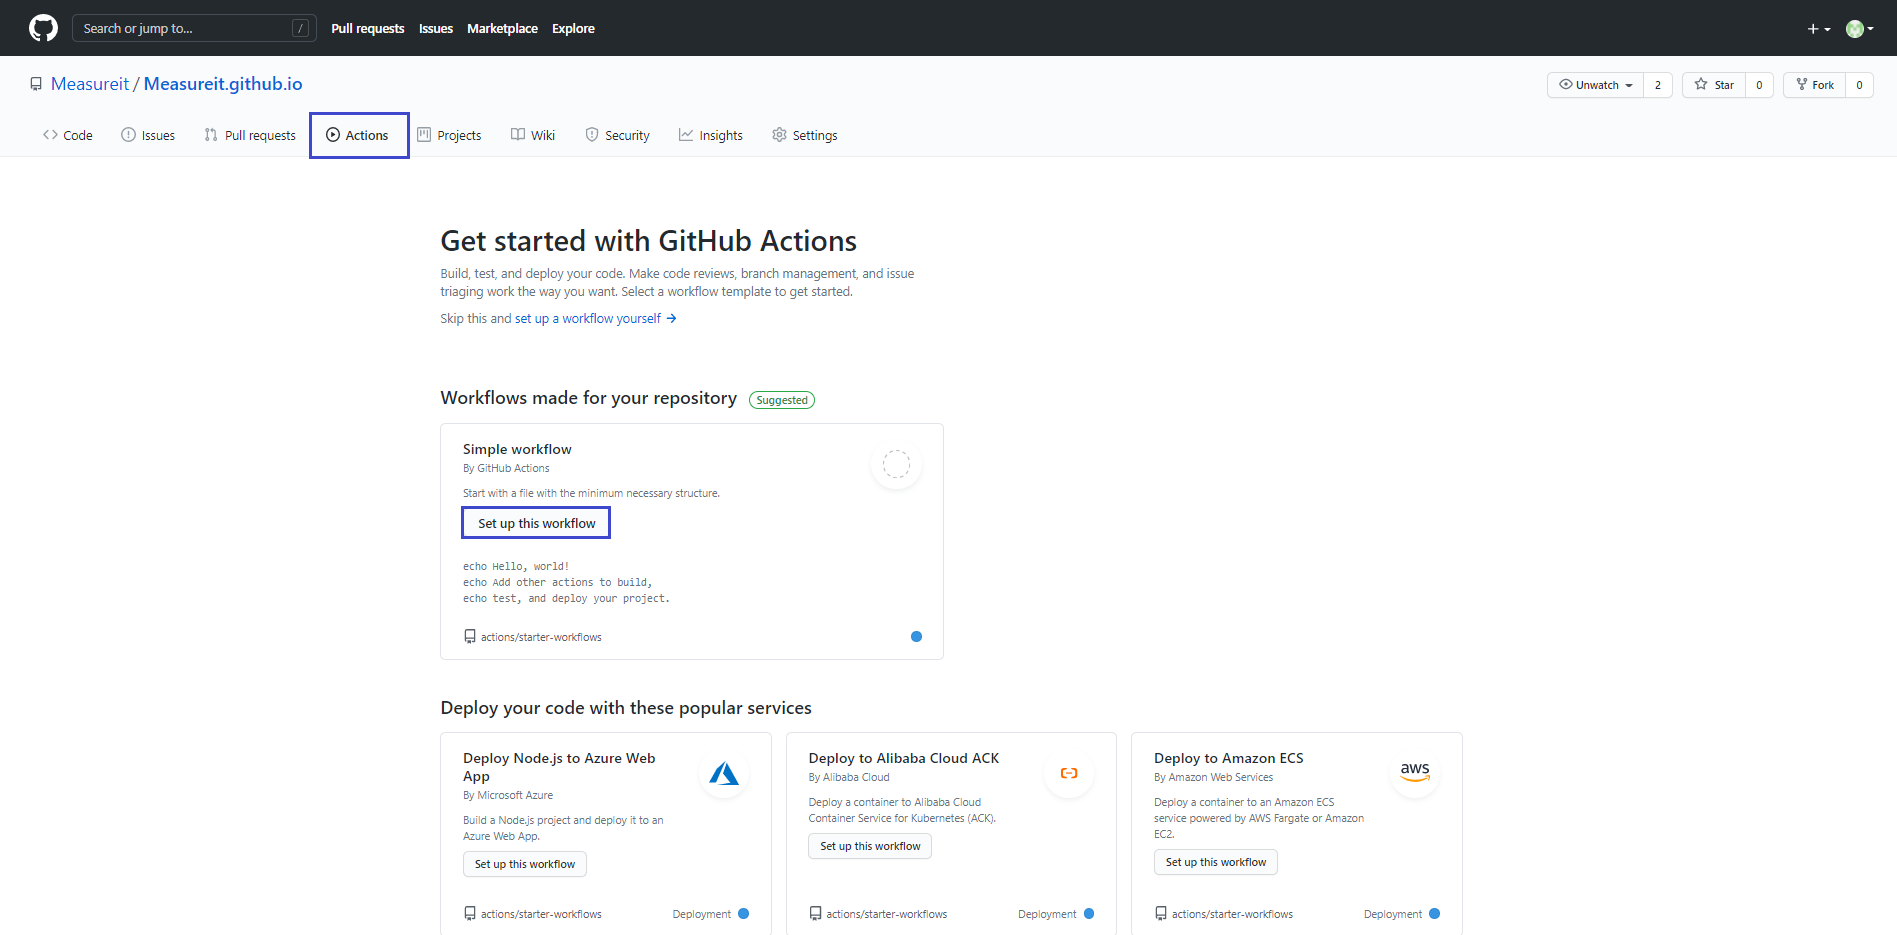 GitHub actions tab
- From the scratch
- clone repository
- create directory .github\workflows in project root
- create
<workflow_name>.YAMLfile with workflow definition in directory .github\workflow
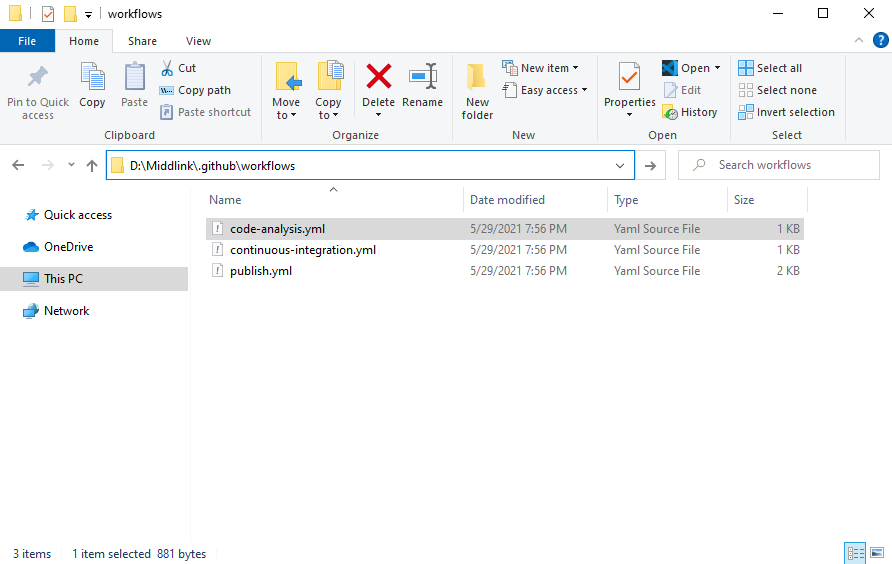 Workflows structure for sample project
2. Script structure
Let’s start by creating a simple workflow script and describing in detail what these magic lines mean.
The first line should contain the name of the workflow and is optional. I strongly recommend including this line because it will enhance script readability (GitHub will attach this name into pipeline visualization).
name: <workflow_name>
The next important part is on keyword, which defines workflow triggers. This section contains definitions of rules for triggering execution.
Triggers can be activated by:
- GitHub events
- scheduled time
- external events
on:
  push:
    tags:
    - "v[0-9]+.[0-9]+.[0-9]+"
For more information, see “Events that trigger workflows”.
The vital section of the script is jobs where we specify the work to do. Each job must include a unique job ID. Jobs run in parallel by default.
Use keyword jobs.<job_id>.needs to change default behavior and run jobs sequentially.
jobs:
  build:
    runs-on: ubuntu-latest

    env:
      working-directory: ./src

    steps:
    - name: Checkout
      uses: actions/checkout@v2

    - name: Build
      run: dotnet build -c Release
      working-directory:  ${{env.working-directory}}
Job definition starts by set runs-on where runner is defined.
We can use the following GitHub hosted runner:
- Windows
- Ubuntu Linux
- macOS
… or create our own VM for running jobs.
A job contains a list of sequential steps. The main responsibility of steps is to configure runner and execute commands.
GitHub actions have a mechanism named actions for defining the combination of predefined commands which provide runtime with necessary tools and tasks. To apply predefined runtime configuration we need to use use keyword.
Our sample step uses the actions/checkout@v2 provided by GitHub community and it handles checkout commit which triggered the workflow.
It is possible to parametrize the actions mechanism using keyword with. You can create your own actions, or customize actions shared by the GitHub community. Take a look on shared actions.
3. Workflows directory
Now we have the basics of how GitHub actions work. Let’s try to build useful workflows for .net library.
I would like to split my automation process into three main blocks. Blocks definition will be put in separate files in .github\workflows directory.
- continouse-integration.yaml
Trigger: push or pull request on master or develop
Motivation: build and test source code
- code-analysis.yaml
Trigger: push or pull request on master
Trigger: cron job on master
Motivation: generate code quality metrics
- publish.yaml
Trigger: push with tag containing version number
Motivation: publish nuget packages
4. Continouse integration workflow
The main aim of this script is to build and test our source code. This workflow is triggered by push or pull request on develop or master branches. I would like to avoid wasting resources so I decided to use keyword paths-ignore to exclude workflow execution for **.md files changes.
Workflow uses the latest ubuntu runner. It is possible to define some workfow constants in env section. I used it to set the source code location.
The key part of the build job is to define the following three steps:
-
Checkout - use predefined action actions/checkout@v2 to checkout triggered git commit
-
Build - execute dotnet build command in working directory
dotnet build -c Release
- Test - execute dotnet test command in working directory. There is –no-build flag to avoid redundant build.
dotnet test -c Release --no-build
name: CI
on:
  push:
    branches:
      - develop
      - master
    paths-ignore:
      - '**.md'
  pull_request:
    branches:
      - develop
      - master
    paths-ignore:
      - '**.md'
jobs:
  build:
    runs-on: ubuntu-latest
    env:
      working-directory: ./src

    steps:
    - name: Checkout
      uses: actions/checkout@v2

    - name: Build
      run: dotnet build -c Release
      working-directory:  ${{env.working-directory}}

    - name: Test
      run: dotnet test -c Release --no-build
      working-directory:  ${{env.working-directory}}
The entire continouse integration workflow
5. Code analysis workflow
The aim of this script is to apply quality gate for C# projects. This workflow is triggered by push, pull request or scheduled as a cron job.
The workflow uses the latest ubuntu runner and many predefined actions containing CodeQL tool. It is important to configure the project language to enable the right analysis.
name: "CodeQL"

on:
  push:
    branches: [ master ]
  pull_request:
    branches: [ master ]
  schedule:
    - cron: '30 10 * * 6'

jobs:
  analyze:
    name: Analyze
    runs-on: ubuntu-latest
    permissions:
      actions: read
      contents: read
      security-events: write

    strategy:
      fail-fast: false
      matrix:
        language: [ 'csharp' ]
        # CodeQL supports [ 'cpp', 'csharp', 'go', 'java', 'javascript', 'python' ]

    steps:
    - name: Checkout repository
      uses: actions/checkout@v2

    - name: Initialize CodeQL
      uses: github/codeql-action/init@v1
      with:
        languages:  ${{ matrix.language }}
        queries: security-and-quality

    - name: Autobuild
      uses: github/codeql-action/autobuild@v1

    - name: Perform CodeQL Analysis
      uses: github/codeql-action/analyze@v1
The entire Code analysis workflow
After the first execution we can observe analysis results on GitHub repository webpage, and then proceed to improve code quality.
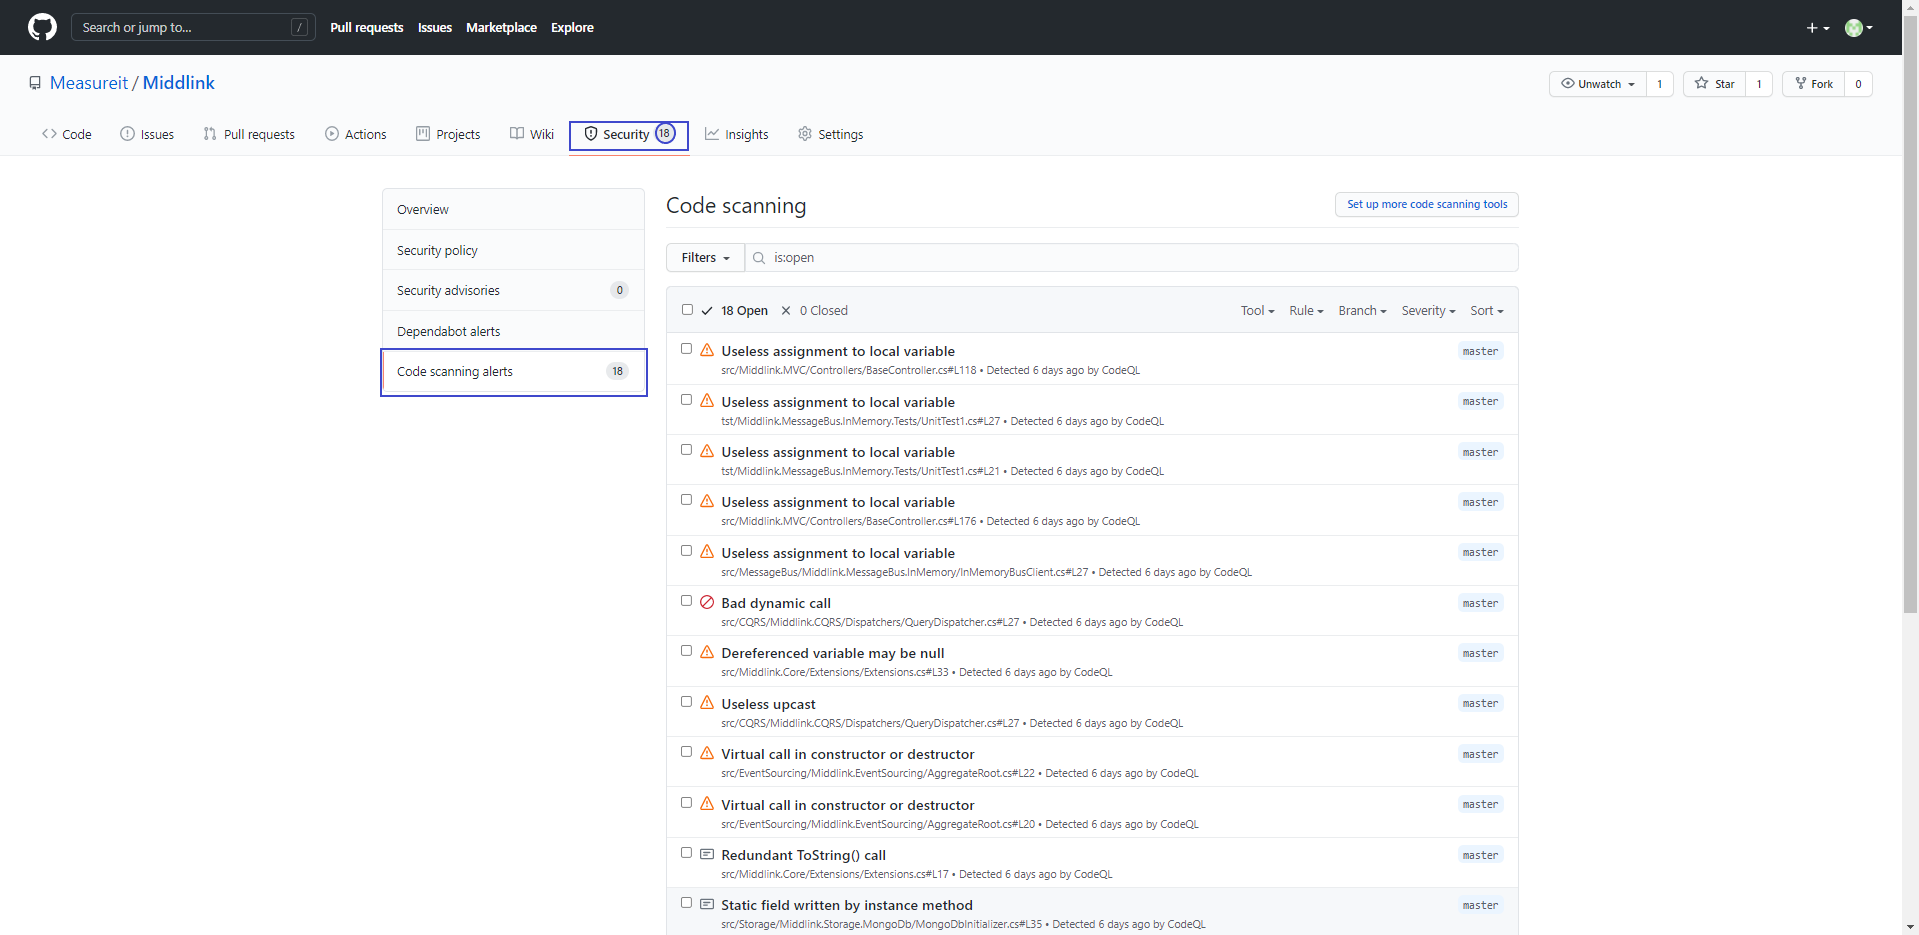 Alerts after code analysis
6. Publish workflow
The last workflow responsibility is publish .net library on NuGet. To avoid accidental publishing, the workflow is triggered by pushing a tag that matches the version pattern (e.g. v.1.4.1).
The workflow uses the latest ubuntu runner.
Let’s go through steps definition.
-
Checkout - use predefined action actions/checkout@v2 to checkout triggered git commit
-
Setup dotnet - use predefined action actions/setup-dotnet@v1 to setup dotnet environment
withversion'5.0.x' -
Set VERSION variable from tag - read version number from git tag and set it as a variable
-
Build - execute dotnet publish command with version number retrieved from git tag
dotnet publish -c Release /p:Version=${VERSION}
This command will generate NuGet package (**.nupkg) when dotnet project file is defined as follows:
<Project Sdk="Microsoft.NET.Sdk">
<PropertyGroup>
    <TargetFramework>netstandard2.0</TargetFramework>
    <GeneratePackageOnBuild>true</GeneratePackageOnBuild>
    <PackageId>Middlink.Core</PackageId>
    <Authors>Jarosław Kurdzieko</Authors>
    <Owners>Measureit</Owners>
    <ProjectUrl>http://measureit.pl</ProjectUrl>
    <Copyright>Copyright (c) Measureit</Copyright>
    <Product>Middlink</Product>
    <Description>Middlewares interface library.</Description>
    <PackageTags>Middlink</PackageTags>
    <LangVersion>9.0</LangVersion>
    <PackageLicenseExpression>MIT</PackageLicenseExpression>
    <RepositoryType>Git</RepositoryType>
    <PackageReleaseNotes>Release notes:</PackageReleaseNotes>
    <RepositoryUrl>https://github.com/Measureit/Middlink</RepositoryUrl>
  </PropertyGroup>
</Project>
- Test - execute dotnet test command with version number retrieved from git tag. There is –no-build flag to avoid redundant build.
dotnet test -c Release /p:Version=${VERSION} --no-build
- Push nuget - push package to NuGet registry instance
secrets.NUGET_DEPLOY_KEY and secrets.NUGET_URL are store in Encrypted secrets
- Upload Artifact - upload artifacts
name: Release Middlink

on:
  push:
    tags:
    - "v[0-9]+.[0-9]+.[0-9]+"

jobs:
  publish:
    runs-on: ubuntu-latest
    env:
      working-directory: ./src
      artifact-directory: ./bin

    steps:
    - name: Checkout repository
    - uses: actions/checkout@v2

    - name: Setup .NET
      uses: actions/setup-dotnet@v1
      with:
        dotnet-version: '5.0.x'

    - name: Set VERSION variable from tag
      run: echo "VERSION=${GITHUB_REF/refs\/tags\/v/}" >> $GITHUB_ENV

    - name: Build
      run: dotnet publish -c Release /p:Version=${VERSION}
      working-directory:  ${{env.working-directory}}

    - name: Test
      run: dotnet test -c Release /p:Version=${VERSION} --no-build
      working-directory: ${{env.working-directory}}

    - name: Push nuget
      run: dotnet nuget push **/*.nupkg
        --api-key  ${{ secrets.NUGET_DEPLOY_KEY }}
        --source   ${{ secrets.NUGET_URL }}
        --no-symbols true

    - uses: actions/upload-artifact@v1
      with:
        name: Middlink
        path:  ${{ env.artifact-directory }}/AnyCPU/Release
      name: Upload Artifact
The entire Publish workflow
7. Summary
GitHub actions are a powerful tool for automating software processes. There is a lot of possibilities to improve your workflow by using existing templates and shared GitHub community actions. I strongly recommend testing this solution and rate it yourself.
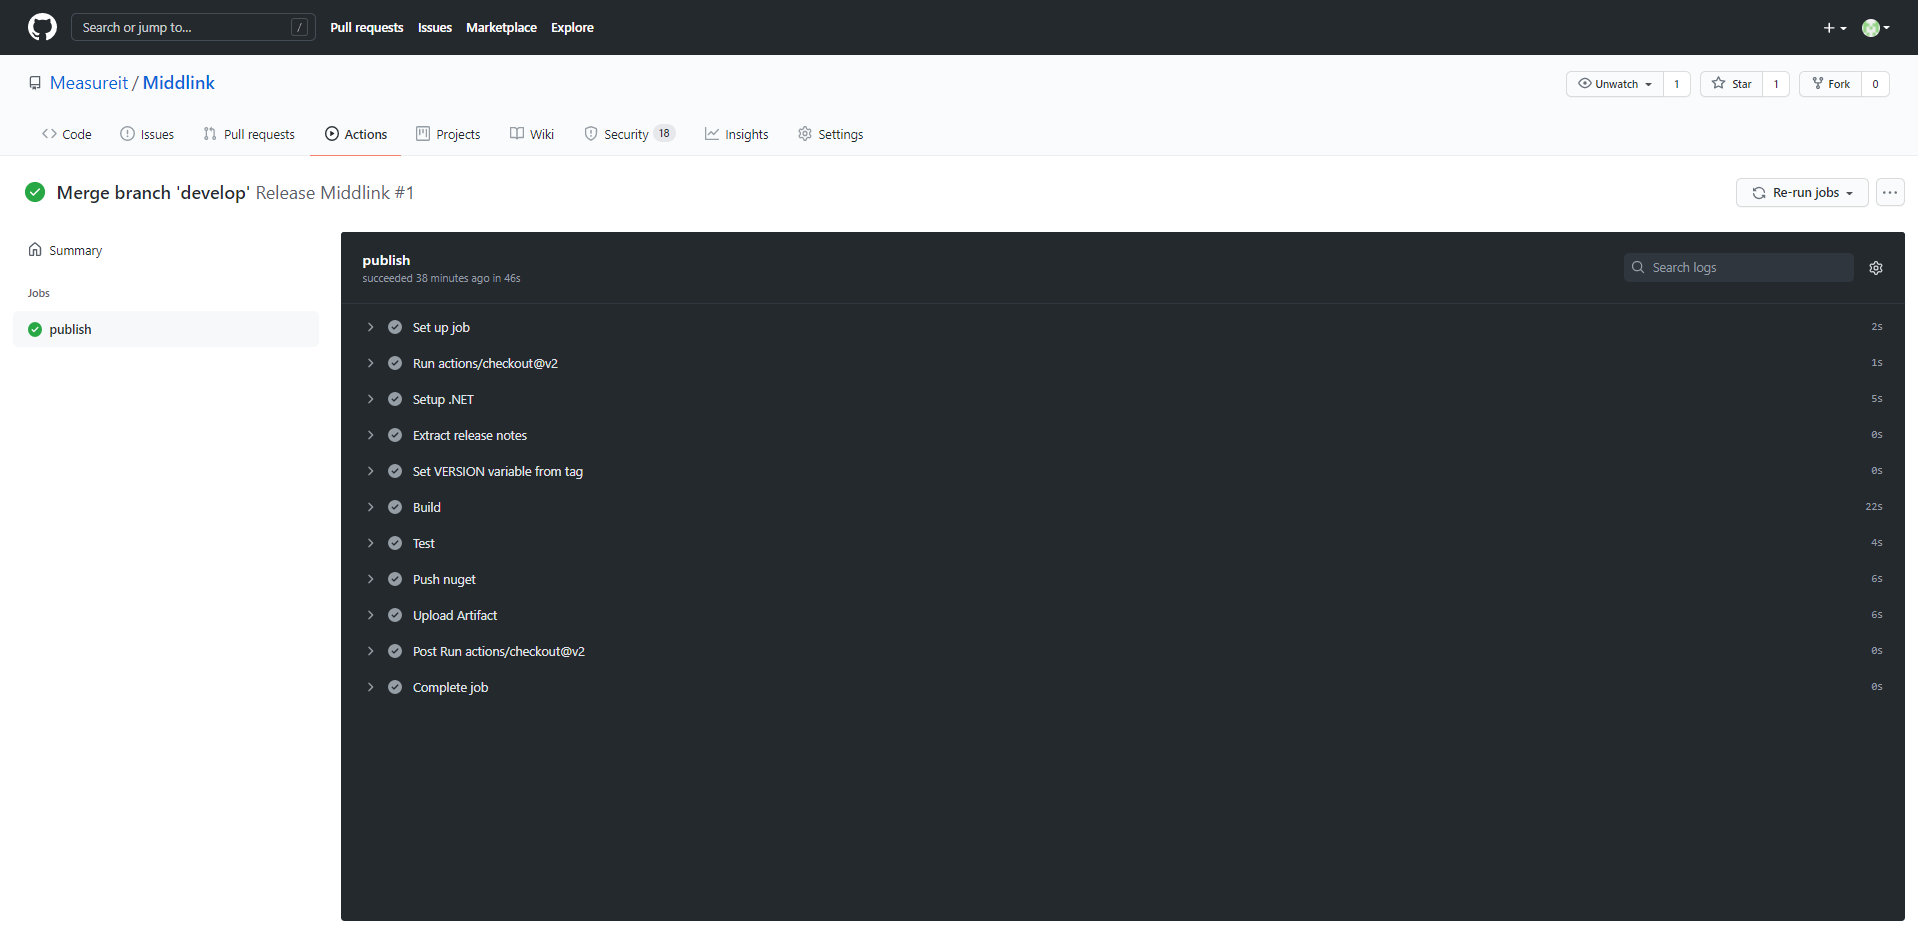 Release .net library
I am thinking about my own roslyn code analyzer inside shared GitHub actions.
Links
- https://github.com/marketplace?type=actions
- https://docs.github.com/en/actions
- https://www.stevejgordon.co.uk/getting-started-with-github-actions-for-dotnet-developers
Photographs designed by upklyak / Freepik.